Let's begin with a summary of items that have rolled over from year to year. Some of these we have decided we are not going to do, but here's the full list:
outdoor patio around bottom of deck stairs (moves grill off deck) - no longer happening
walkway from driveway around the lilacs to outdoor patio - no longer happening
living hedge border along far-side of the yard and down the driveway - started but incomplete
flowering shrubs on the inside of yard edge - no longer happening
backup generator for whole house - still a possibility but we are leaning towards no
air exchange unit for the house
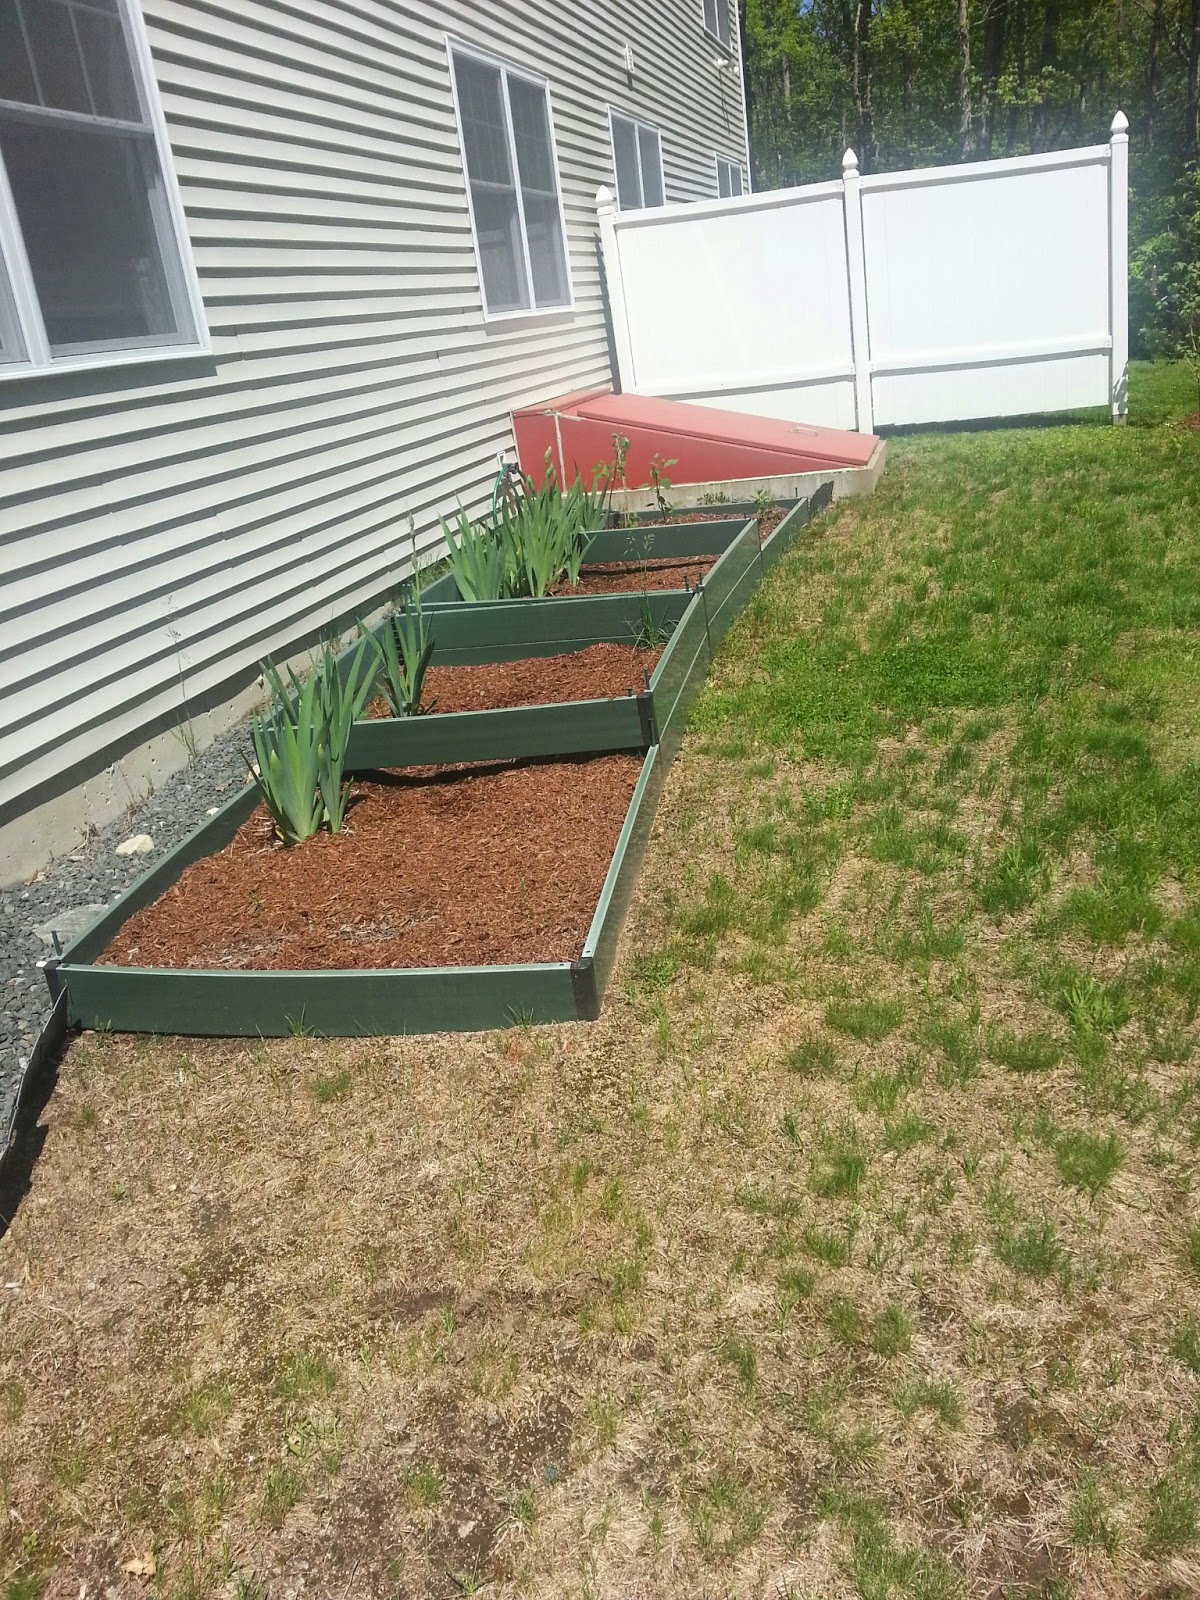
new bulkhead for the basement exterior stairs
backyard shed - no longer happening
figure out garage storage
re-paint guestroom
continue clearing edges of yard
1 or 2 bonfires to clean-up yard waste and deadwood
If we take the above list and remove the items that are no longer going to happen, we have:
living hedge border along far-side of the yard and down the driveway - started but incomplete
air exchange unit for the house
new bulkhead for the basement exterior stairs
figure out garage storage
re-paint study which is now the guestroom
continue clearing edges of yard
1 or 2 bonfires to clean-up yard waste and deadwood
Now let's add a new project to the mix.... a nursery :-)
Needless to say, the list needs a bit of re-arranging! I'll fill you in more as we figure things out, but a lot of my absence over the past few months has been due to the ill-named morning sickness. I'm getting better but some days it's all I can do to get up, go to work, come home and eat dinner, so please pardon the sporadic posts!
Showing posts with label garden. Show all posts
Showing posts with label garden. Show all posts
Friday, January 23, 2015
Thursday, June 19, 2014
Garden Beds
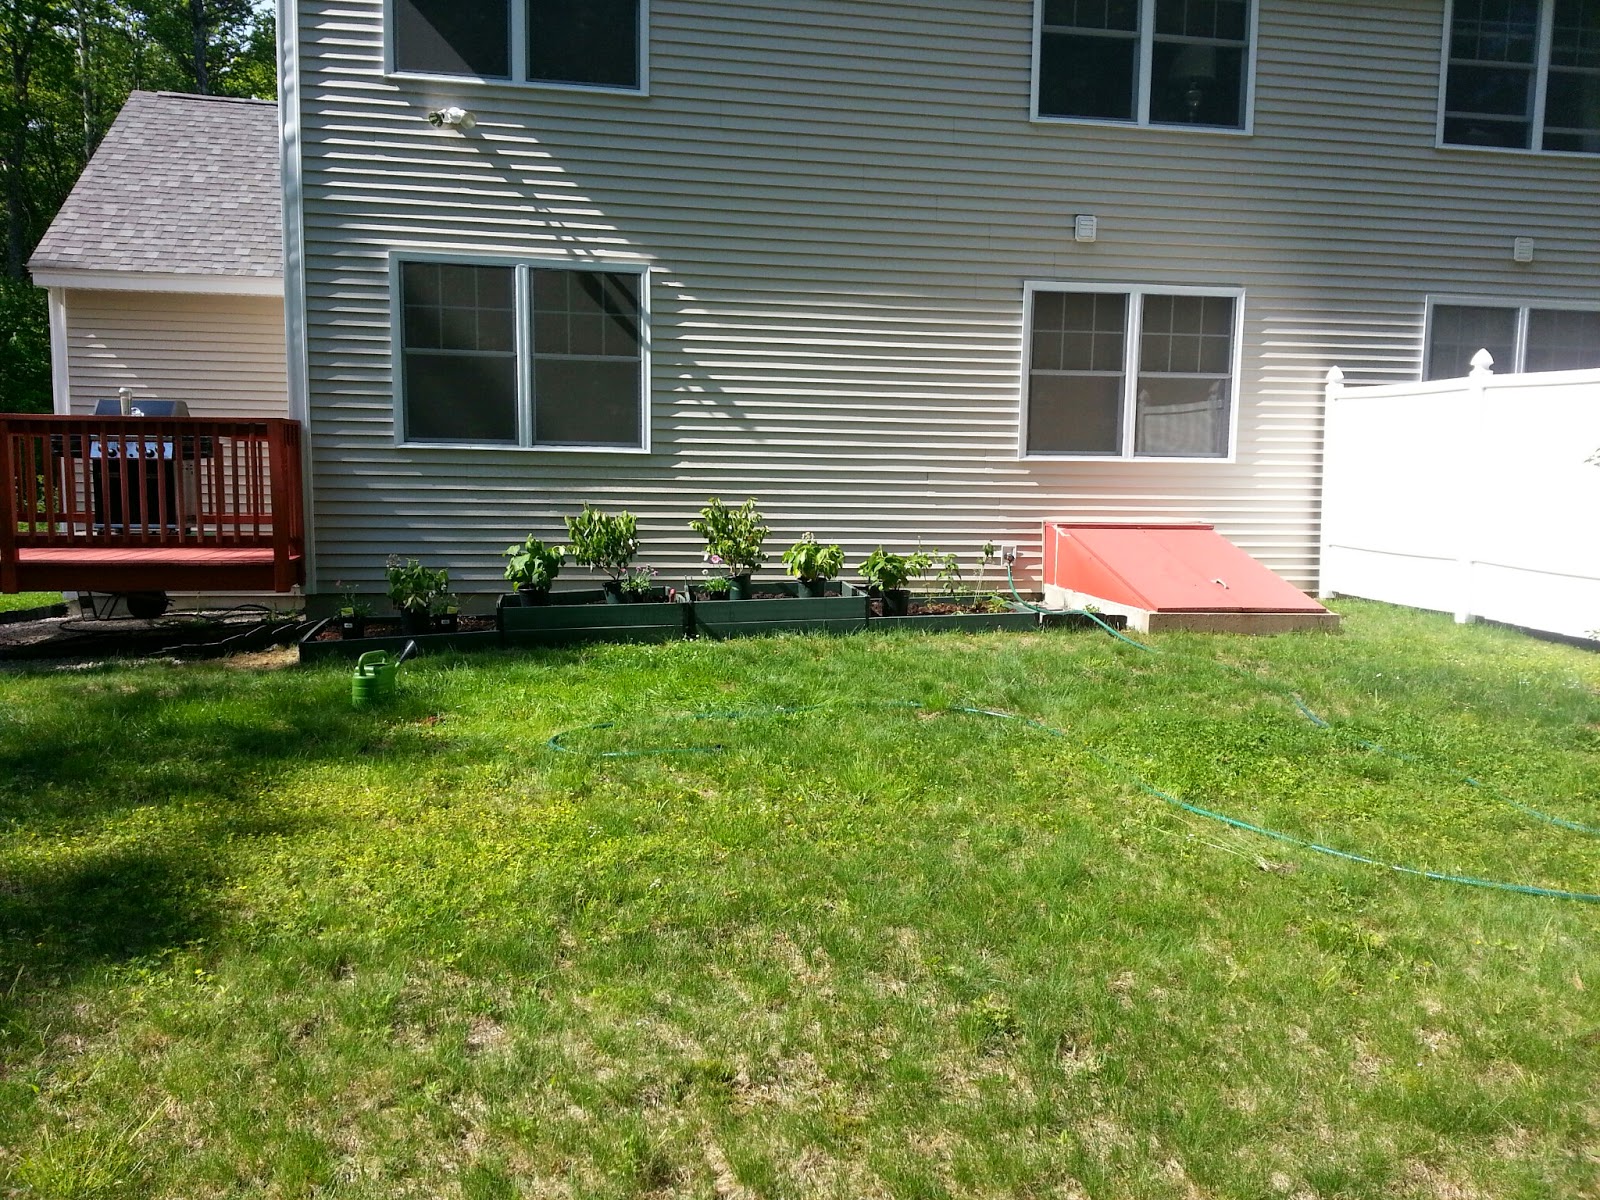
So last time I showed pictures of the back raised garden bed and the triangle garden bed, they looked like this:


 I know some of the plants look a bit droopy - we've had some really hot days this week, hence the soaker hoses which I've been turning on at night for a few hours to help the new plants establish themselves.


 Don't worry about all the open space, these plants will fill in and it leaves me a bit of space to maybe add something around the edges next year.... but for this year, they are fini! :-)
Still a bit low on dirt/mulch and maybe needing another plant or two!
Last night I put in a few more plants and a TON of mulch so that now all the beds are full!
I bought 8 bags of mulch and used all but one bag!!
I might use this bag to fill in some areas in the yard/other garden beds.
So much better, right? :-)
Monday, June 2, 2014
Happy June! & plantings
Over the years, I've done some serious yard work to not just expand the yard/grassy area but also clean up the edges and put in some gardens beds. Matt and my parents have helped plant bushes and trees :-)
We've discovered some hidden gems (wild blueberry bushes) along with some problem areas - the yard isn't even close to being level and has flooding issues in the spring, it's soil is very sandy, etc. BUT! I haven't really spent time on filling in the newly created garden beds. I basically threw some bulbs and maybe a plant or two and left them. The good news is that since I added more dirt and mulch to the new garden beds as I went along, the dirt in them is getting pretty good!! :-)


We've discovered some hidden gems (wild blueberry bushes) along with some problem areas - the yard isn't even close to being level and has flooding issues in the spring, it's soil is very sandy, etc. BUT! I haven't really spent time on filling in the newly created garden beds. I basically threw some bulbs and maybe a plant or two and left them. The good news is that since I added more dirt and mulch to the new garden beds as I went along, the dirt in them is getting pretty good!! :-)
Starting point this spring of what I call the Triangle Bed.
It sits in the middle of the side yard and is visible from almost all angles of the yard.
My favorite maple tree sits in the middle
Starting point for the raised garden beds along the back of the house
the green 'twigs' are new hydrangea shoots given to me by a co-worker
looking pretty bare :(
enter 8 bags of dirt, 6 hydrangeas
after putting them out there..... not going to be enough
round 2!! plants for the raised beds in back, the triangle bed and another 8 bags of dirt
love that my CR-V carries it all plus us and Reese - no sweat!
This is after I put in the 16 bags of dirt. 40pds a piece.
I know. Still not enough dirt!
But the plantings are looking better.
I have to remember that the 2 center hydrangeas will grow to be 6 ft tall
the smaller ones will be 4 ft tall - ie, must leave growing room even if it still looks a bit sparse.
love my soaker hoses!!
I will be adding more dirt and a heavy layer of fresh mulch on the top of everything
I might pick up 2 more astors for the far left lower bed too
The Triangle bed received all the iris from the raised beds as well as 4 new plants.
I'm thinking the iris may move again in future, but I'm not sure where to yet, so they'll stay here for now.
I love the idea of this garden bed being a bit more carefree/wildflower like since that's what it was when we moved in - a field of flowers and 'stuff' before I weed whacked the whole thing and made it part of the yard.
Have you been working in your garden(s) lately?
Tuesday, May 27, 2014
Memorial Day - where has the time gone?
A few weeks ago, (maybe it's been a month now!) I was chatting with a co-worker about planting a few hydrangeas along the back of the house. She said she had way too many young shoots that she was going to be cleaning out and she'd be happy to give me a few!
Here they are, 4 little shoots of hydrangeas starting to take root. Well, while planting them I found more grubs (ICK!) than I would like in my garden beds and since we've had an awful infestation of Japanese beetles the past few years I knew it was time to take drastic action and not wait for them to attack again this year.
 I'll be honest. I did my research. Last year we used Grubex. too little, too late. This spring I tried Milky Spore first. It's a natural bacteria that kills grubs. I will say, it's expensive. It's a pain in the you know what to put down because it's powder and has to be applied with a teaspoon in a grid-like pattern spaced 1ft apart. Of course, AFTER I spend hours applying it to certain sections of the lawn (they didn't have enough to cover the entire lawn at the store) I came across this study done at UNH - right down the road from us: http://extension.unh.edu/resources/files/Resource000876_Rep922.pdf
Greeaaaaattt. I don't have 3-4 yrs for the bacteria to build up and I'm not sure what type of Japanese beetle we have. Sigh. So much for that. So I went to Amazon.com and got 8 bags of Grub Control w/Turf Revitalizer which targets 4 types of grubs and numerous other insects. It works immediately. yahoo!
 I spread that on the ENTIRE yard (I won't call it lawn) on Saturday morning of Memorial Day weekend and then snapped some shots around the yard:
 My Mum brought me some of her Lily of the Valley last summer and I planted them in the front bed to fill around the little bushes and trees. I didn't plant them at the right time of year - just kinda plopped them in there, so I'm thrilled that they are up and flowering this year!

 My FIRST LILAC blooms!!!! My little twigs along the garage wall are happily growing and this one decided it could muster 3 blooms :-) I'm so excited!!! I dream of this wall being covered by towering lilacs that bloom all summer long!
 This is the twiggy maple tree that we've almost lost to Japanese beetles every year since we planted it (3yrs). Yes, it's still staked, but I've loosened all the ties so it's mostly standing up on its own now. Although with all those crazy leaves on top this year I think it looks like a lolli-pop!

 These are the 2 larger lilacs that we planted last summer. No blooms but the leaves are coming in strong. I wasn't really concerned about them too much, but still nice to know they're healthy!
 Back of the house for the start of this year - pretty pitiful since I put in those raised beds a couple years ago! I've been slowly putting more dirt/topsoil/loam into them every year in an effort to get them filled. The end boxes are doing better than the taller middle ones.
 Sunday of Memorial Day weekend Reese and I took a trip to Lowe's and stocked up on some bigger hydrangeas that were on sale along with more good garden dirt :-)
 I hope to get all of these into the garden this week - it will absolutely help with the bare bones look we currently have going on!
The rest of our weekend was filled with friends, family and a few hours of downtime with Reesey-face :-)
It went by all too quickly, as long weekends are wont to do, but it's a wonderful start to SUMMER!
Here they are, 4 little shoots of hydrangeas starting to take root. Well, while planting them I found more grubs (ICK!) than I would like in my garden beds and since we've had an awful infestation of Japanese beetles the past few years I knew it was time to take drastic action and not wait for them to attack again this year.
Greeaaaaattt. I don't have 3-4 yrs for the bacteria to build up and I'm not sure what type of Japanese beetle we have. Sigh. So much for that. So I went to Amazon.com and got 8 bags of Grub Control w/Turf Revitalizer which targets 4 types of grubs and numerous other insects. It works immediately. yahoo!
WOW! the grass is bad back here too :(
The rest of our weekend was filled with friends, family and a few hours of downtime with Reesey-face :-)
It went by all too quickly, as long weekends are wont to do, but it's a wonderful start to SUMMER!
Saturday, January 11, 2014
To-Do List for 2014
Now that it's January of 2014, I thought it would be good to do a quick look-back on what we got done in 2013 and what's ahead of us for this year:
To-Do List for 2013:
finish basement shell- waterproofing and insulation, walls, ceiling and lights, heated tile floor, internet and electrical
IF we can get all that done and still have time/money left, we will also do the shed in the backyard
Well, we did get the basement finished (yes, it sort of crossed over to 2014, but I'm calling it 2013), while the shed in the yard didn't happen. We did however, get gutters up on the front of the house, put in another flower bed around the tiny oak tree in the side yard and started the living hedge in the backyard. We also traded in both our cars, so while we may have car payments added back into the budget (ick), crazy random repairs and the worry of a dead-on-the-side-of-the-road car is no more! (yay!)
leaving other long-term projects for 2014 like:outdoor patio around bottom of deck stairs (grill moves off the deck)walkway from driveway around lilacs to outdoor patioboxwood border along far-side of yard and down drivewayplant flowering shrubs on inside of yard edgeback-up generator for entire house
new sofa for living room
seal metal bar supports and possibly re-level kitchen barair-exchange unit for house
Hmmm... The above list for 2014 has been revised to look more like:
- whole house water filter - we have an artisan well and while we love it, we're starting to see some serious mineral build-up in sink faucets, shower heads and appliances.
- new bulkhead - finishing the basement showed us how truly leaky and unsealed the current bulkhead is and since we've just finished the basement, we want to protect it!
- fix the granite bar - it has been shifting down for the last few years and is no longer level. We had it looked at to make sure it won't fall off - that would be awful! - but it needs to be fixed.
- furniture: new living room couch (current couch will be going into the basement) and ottoman, coffee table and media center (with new TV) for the basement.
- yard: fill in raised beds in back with big plants (hydrangeas or butterfly bushes), fill-in oak tree flower bed and continue living hedge.
- go on vacation! - we've been very bad at this in recent years but 2013 summer with weekend adventures and camping showed us how much we love to travel and how much we NEED that downtime!
Nothing hugely exciting, more maintenance to keep the house going. We'll also address anything else that comes up over the course of the year but this is the basic plan of action :-)
Tuesday, October 22, 2013
FALL


Matt is chomping at the bit to get at least 1 of these pumpkins all carved up!
I can't decide on a design!


I made this last year as part of my
how-crafty-cheapo-can-I-be-and-still-look-festive decorating
and I liked it so much I kept it :-) It's simple. and it works!

In other news, after growing out my hair for several years....

I chopped it! and I love it! (sorry I don't have a better pic)
so much easier for early morning pool and gym sessions
Sunday, October 20, 2013
Front Gutters Re-Visited
When our front gutters were installed I spoke to the installer about burying the drainage. He said he could do that but it would cost more.... OR, he could tell me how to do it and where to go for the parts and I could do it myself. Even though the condo association was footing the bill, I voted for the second option - why turn down a learning opportunity?
 Maybe because he would have done it same day in September where it took me until mid-October and 2 trips to the store before I got it right? :-) learning opportunity! Above picture is parts needed: 25ft of corrugated tubing with no perforation and end caps to transition from the square gutter to the round tubing.
 Here is where the gutters leave off and you can see - even in the short time they've been left - how much mulch and garden dirt the water has moved. not good. especially like below where it is almost pointed directly at the shrub.

 End caps on all 3 downspouts and then time to stretch out the tubing..... all 25 feet of it!

 Since we have three downspouts, before I left I had measured that the two porches needed 7ft to get to the garden edge which the center needed 10ft. instead of buying all separate lengths, I opted for one 25 footer and then measure and cut what I needed for each one.


 Once each drain was placed, I dug a shallow trench (using a trowel) and placed the tubing in the trench
 filling back over it with the mulch. The idea is for the tubing to disapear in the garden bed


 And done! Our fall clean-up crew will rake the garden bed which will make it less obvious. I might go back and trim the one of the far right a bit but we'll see how it drains first.

One
Two
Three
One
Two
Three
Ta Da! not bad for about an hours worth of work and a learning experience :-)
Subscribe to:
Posts (Atom)